Thursday, August 29, 2013

Reset Password Win 7 & Win Server 2008

Beberapa minggu yang lalu, lupa akan password WS 2008 R2 yang baru saia tukar membuat beberapa pekerjaan tertunda. Ternyata setelah keliling-keliling dunia mencari suhu-suhu di google, akhirnya saia menemukan cara yang unik dan ini merupakan bugs dari Windows Vista, Windows 7, dan Windows Server 2008 yang menggunakan fitur-fitur default yang biasanya tidak dinonaktifkan. Lupa akan password bisa bahaya, apalagi kalau passwordnya bisa di tukar orang yang tak bertanggung jawab… tapi ini menyelamatkan sedikit dari sisa pekerjaan saia. Check it out…

[SOLVED] Reset Password Win Vista, Win 7 & Win Server 2008

Artikel berikut ini digunakan pada komputer yang sama sekali tidak ada user yang bisa login bahkan administrator sekalipun. Sehingga tujuan artikel ini, agar user yang kita targetkan dapat dirubah passwordnya.
Warning : Ini digunakan untuk tujuan pembelajaran saja, silahkan matikan fitur yang tersebut jikalau tidak dipakai. Jika penyakit berlanjut hubungi dokter… :D
Bahan-bahan yang harus disiapkan :
  • Bootable DVD Instalasi dari Win Vista / Win 7 / ataupun Win Server 2008 ( pada artikel ini saia menggunakan Win 7 Ultimate 32 bit )
  • Komputer yang lupa password tentunya… :D
Kalau bahan sudah lengkap.. ikuti langkah-langkah berikut ini :
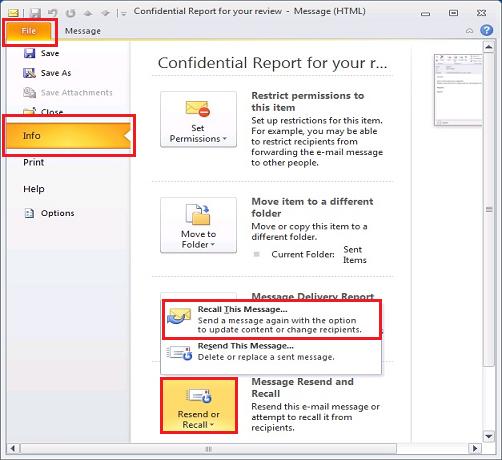
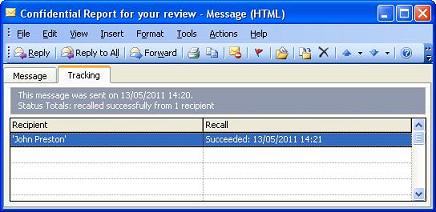
  1. Boot lewat DVD Instalasi
  2. Masuk ke “Repair your computer
    [SOLVED] Reset Password Win Vista, Win 7 & Win Server 2008
  3. Pilih Sistem Operasi aktif
  4. Lalu masuk ke mode “Command Prompt
    [SOLVED] Reset Password Win Vista, Win 7 & Win Server 2008
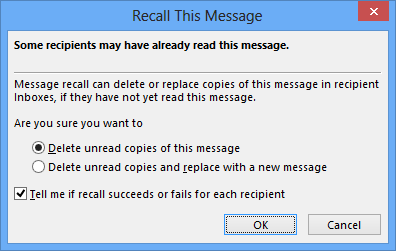
  5. Lalu backup magnify.exe menjadi magnify.old
    copy x:\windows\system32\magnify.exe x:\windows\system32\magnify.old
    x = direktori partisi system windows
  6. Lalu copy cmd.exe menjadi magnify.exe
    copy x:\windows\system32\cmd.exe x:\windows\system32\magnify.exe
    x = direktori partisi system windows
    [SOLVED] Reset Password Win Vista, Win 7 & Win Server 2008 
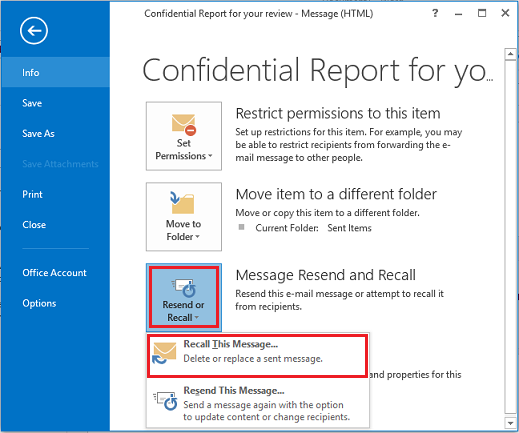
  7. Lalu Klik Restart, dan booting dari Harddisk.
  8. Klik tombol Ease of access ( fitur accessibility ) di kiri bawah login screen.
    [SOLVED] Reset Password Win Vista, Win 7 & Win Server 2008
  9. Lalu centang kotak yang mengaktifkan Magnifier. Lalu Klik OK.
    [SOLVED] Reset Password Win Vista, Win 7 & Win Server 2008
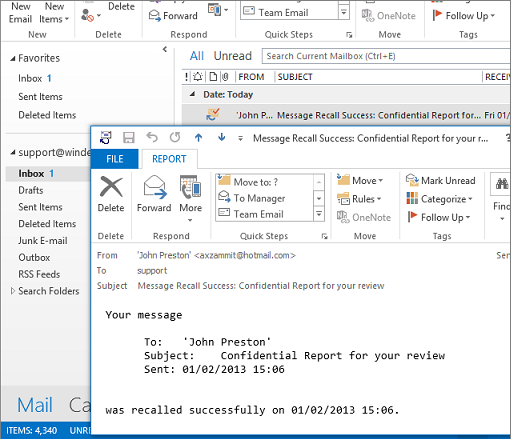
  10. Terbuka cmd.exe yang kita copy kan tadi. Lalu ketikkan perintah berikut,
    net user namauser passwordbaru[SOLVED] Reset Password Win Vista, Win 7 & Win Server 2008
  11. Selesai, langsung login dengan user baru di Login Screen.
    [SOLVED] Reset Password Win Vista, Win 7 & Win Server 2008
  12. Jangan lupa untuk mengembalikan magnify.old ke magnify.exe agar fungsi magnify berfungsi kembali.
Cara ini merupakan bugs, jadi jikalau anda tidak ingin password and diganti oleh orang yang tidak bertanggung jawab, matikan fitur ease of access dari windows anda. Walaupun kadang bisa bantu kita untuk mereset password sendiri seperti saia. hehehe…
sumber inspirasi : disini

Tips : Cara mengatasi lupa password pada windows xp dan windows 7


Cara Reset Password Administrator Lupa pada Windows 7?

Pertanyaan:
Saya lupa password saya ke komputer saya. Aku satu-satunya administrator dan sistem operasi saya Windows 7. Bagaimana saya bisa mereset password Windows?
Jawaban:
  Opsi 1: Kembalikan komputer Anda ke pengaturan pabrik.
  Cara yang baik adalah untuk mengembalikan komputer Anda kembali ke pengaturan pabrik atau menginstal ulang sistem operasi komputer Anda. Tentu saja kemudian Anda akan kehilangan segala sesuatu di dalamnya.
Opsi 2: Reset password dengan menggunakan Windows Password Breaker. Ini akan dikenakan biaya beberapa dolar, tapi sangat efektif. Anda dapat mereset password administrator lupa pada Windows 7 dalam beberapa menit tanpa kehilangan data melalui metode ini.
Windows Password Breaker adalah kuat Windows 7 sandi alat ulang yang bekerja dengan baik pada Windows 7/Vista/XP/2000 dan Server 2003 (R2) / 2008 (R2). Dengan bantuan Windows Password Breaker, Anda dapat membuat password bootable ulang CD / DVD atau USB flash drive untuk me-reset sandi Windows lupa Anda, seperti Windows Administrator Lokal, password pengguna Standar dan tamu, dan Windows password Administrator Domain juga.
Untuk memulai, silahkan mengambil langkah-langkah di bawah ini:
  Langkah 1: Download dan instal Windows Password Breaker Profesional
  Langkah 2: Membakar password bootable ulang CD / DVD atau USB flash drive sebagai instruksi
  Langkah 3: Reboot komputer terkunci dari terbakar CD / DVD / USB
  Langkah 4: Reset hilang Windows 7 password administrator
Opsi 3: Ambil Lupa password Windows 7
  Ophcrack adalah Windows password cracker bebas berdasarkan tabel pelangi. Ini adalah implementasi yang sangat efisien tabel pelangi dilakukan oleh penemu metode ini. Muncul dengan Graphical User Interface dan berjalan pada berbagai platform.
  Metode ini gratis, tetapi tingkat keberhasilannya tidak dijamin dan waktu untuk mendapatkan kembali password tidak diketahui.

Tip:
  Hidup di dunia yang penuh dengan berbagai password, itu sangat mudah bagi seseorang untuk lupa password-nya (s). Untuk ini, sebaiknya Anda menuliskan password di suatu tempat yang aman dan swasta. Ketika datang ke Windows 7, Anda dapat membuat sebuah password reset disk di muka untuk dalam kasus masalah ini sama.

  Windows 7 mencakup fitur untuk membuat disk reset password untuk password user-nya. Setelah Anda me-reset lupa password Windows 7, Anda dapat membuat sebuah password reset disk sebagai berikut:
  1. Login ke account administrator.
  2. Pergi ke tombol, Control Panel, Family Safety dan User Account, Akun Pengguna Mulai.
  3. Klik link Buat reset disk password pada panel kiri.
  4. Pada wizard yang akan datang, klik Next.
  5. Ikuti instruksi wizard untuk menciptakan disk reset password.

Catatan:
  1. Silakan label dan menyimpan password reset disk di tempat yang aman karena siapa pun dapat menggunakan disk ini untuk mengubah password Windows Anda dan mengakses data komputer Anda.
  2. Ini disk reset password hanya dapat digunakan untuk me-reset password untuk account pengguna yang itu dibuat untuk.

Using Hiren's Boot CD to Create Admin User Accounts

Overview

If you’ve ever forgotten a password and none of the usual tricks work to get you back into your Windows box, then a boot CD like Hiren is a must. Of all the things that you can do with this boot disc none is as useful as making admin accounts. What this means is that if you have physical access to a machine then there is nothing to prevent you from gaining administrative access.
You can download the ISO for Hiren at http://www.hirensbootcd.org This article presumes you already know how to create a boot disc from and ISO image and can boot to it. If you’ve never used the Hiren Boot CD before then do yourself a favor and try it. It is an indispensable tool in any technician’s bag of tricks.

1) After booting the disc, select the mini XP option. Once your at the desktop click on the wrench icon in the notification area and navigate to Pass Renew. The path is: Passwords/Keys-Windows Login- Password Renew.
2) At the Pass Renew screen click on “Select Target” in the lower right. Then browse to the Windows folder on the local hard drive.
3) Click OK, then click on the “Create new Administrator user” option under “Select a task” on the left of the screen. Then enter the username and password you want to use for the new account. For this tutorial we’ll use testadmin as the username. Then click the “Install” option under “Select an (a) action” on the left.
4) You will see a popup stating that the creating the new user is “Done.” Go ahead and click “OK”
5) Now there is one trick to this next step that you must do correctly. DO NOT “X” OUT! You must click the “Quit” option under “Select an action” to finish using the program and use the account just created. If you simply click the “X” then the account will show up on the Welcome screen but you won’t be able to logon. So make sure to click “Quit.”

Wednesday, August 21, 2013

Recalling Emails from Outlook 2013, 2010, 2007, 2003

Updated on 1st February 2013 to include Outlook 2013 instructions.

Message recalling is the process of deleting emails sent in error. Microsoft Exchange provides a native solution for this purpose, however too often this fails to do the job. WinDeveloper Message Recall greatly improves this functionality by adding a server side recalling process. Users are provided with a predictable solution that reliably fulfills their recall requests.
WinDeveloper requires no new client-side software. Users recall messages from Outlook exactly in the same manner they do in native recalling. The product also generates success/failure notifications identical to those of the native recall implementation rendering this Exchange add-on completely transparent.
This document shows how to recall emails from various Outlook clients. WinDeveloper Message Recall does not introduce anything new in Outlook. Indeed these are the same steps used for recalling emails when relying exclusively on the native Exchange/Outlook recalling functionality.

Recalling Emails from Outlook 2013 and 2010

Assuming we sent an email that we want to take back, here are the steps to follow in Outlook 2013 and 2010:
  1. Fetch the email to be recalled from the Sent Items folder.
  2. Open the email and at the Ribbon click on File.
    This is what it looks like in Outlook 2013:
    Outlook 2013 - Recall This Message
    This is what it looks like in Outlook 2010:
    Outlook 2010 - Recall This Message
  3. From the Info category select
    Resend or Recall | Recall This Message...

  4. This opens the Recall Options dialog. Note that from here on the screenshots are taken from Outlook 2013. However exactly the same steps also apply to Outlook 2010.
    Recall Options
  5. Here we choose between deleting unread copies of the original message, or to both delete and replace the message. If we choose the latter, the original email opens up for us to edit and resubmit.
  6. Lastly the checkbox at the bottom allows us to choose whether we want to receive notifications on the outcome of the recall request.
  7. Clicking Ok at the Recall Options dialog, the recall request is submitted.
If notifications were requested, within a few minutes, WinDeveloper Message Recall returns a set of success/failure notifications. Here is what a success notification looks like:
Recall Success Notification
Here is a failure notification:
Recall Failed Notification
These notifications allow Outlook to build up tracking information that gets added to the original email at the Sent Items folder. To see this, open the original email from Sent Items. Next, at the Ribbon select Message | Show | Tracking:
Outlook 2013 Tracking
Outlook 2013 - Tracking Success

Recalling Emails from Outlook 2007

All the functionality shown in Outlook 2013 is also available in Outlook 2007. The only difference is in locating the Recall This Message command. This is available at the Ribbon under Message | Actions | Other Actions | Recall This Message.
Outlook 2007 Recall This Message
Other than that, the Recall Options dialog, Notifications, and Tracking look very similar to what we already saw in Outlook 2013.

Recalling Emails from Outlook 2003

Outlook 2003 also provides the same functionality. Things just look a little bit more squarish. Once we open the email from the Sent Items folder, a recall request is submitted from Actions | Recall This Message which again opens the same options dialog we saw before.
Outlook 2003 Recall This Message
There is nothing significantly different in Notifications and Tracking either. Again tracking information will be added to the original email on receiving notifications. Here is what tracking looks like:
Outlook 2003 Tracking


Outlook 2003 - Tracking Success 

Sumber : windeveloper.com/recall/news/2011/0810/how_to_recall.htm

Managing Your 2007 Outlook Mailbox

Check the amount of space used by your e-mail in Outlook 2007, please follow the steps below.

Open Microsoft Outlook 2007 and right-click on your name displayed in the folders pane as shown below. Scroll down to “Properties for “Mailbox -…” and click / select it.
The Outlook Today window will open (shown below). In that window, click the “Folder Size…” button (circled in red) to open the “Folder Size” window.
Outlook properties 
In the “Folder Size” window below, circled in red is the current size of your mailbox which includes all folders and messages and any attachments they may have. 65363 kilobytes converts roughly to 65 megabytes. This particular mailbox is about 65 megabytes in size.
outlook folder size

Tips for minimizing the size of your mailbox.
To get rid of large files that may be taking up the majority of space used by your mailbox, open the “Search Folders” tree in your folders list as shown below and select “Large Mail”.

Once your “Large Mail” view is open, you will see messages grouped by Size categories (Enormous, Huge, Very Large and Large). Review and delete those you don't need any longer.
outlook large mail

Sort your "Sent Items" folder by size by clicking on the “Size” column, shown highlighted in yellow below, and remove large unneeded messages.
outlook sort by size
Look for mail items you may have in your "Junk E-mail" folder, review and delete unwanted messages.
outlook junk mail

Finding Large Messages
  • Click on the “Tools” menu at the top of Microsoft Outlook. Next, select the “Mailbox Cleanup…” from the dropdown menu.
outlook mailbox cleanup

  • Select "Find items larger than" and then fill in a size. Press Find... and you'll see an Advanced Find window open and it will locate the messages. You can delete the messages you no longer need.
outlook find items search
outlook advanced find
Finding Old Messages
  • Repeat the steps above in 2e, but instead select "Find items older than" and then fill in the number of days. Press the "Find..." button. The Advanced Find window opens and it will locate the messages. You can delete the messages you no longer need.
Cleaning Out Your Trash
  • Repeat the steps above in 2e, but instead click on the "View Deleted Items Size..." button to view items in your Deleted Items folder and/or press Empty to delete items from your Deleted Items folder. You can still retrieve them via Recover Deleted Items feature for 30 days.
    Deleted Items folder should probably be emptied upon each exit from Outlook. This is set via: Tools; Options; Other... place a checkmark in the top box.
 Manual Archive to Personal Folders
  • Click on the File menu at the top left of exchange and choose “Archive…” from the drop down list.
outlook archive

  • Make sure that you select the top of your mailbox if you would like to archive the entire mailbox, otherwise, select which folders in your mailbox that you would like to archive. You may choose to archive files older than a specific date, and then click on the browse button.
outlook archive folder selection

  • Save the archive file to your Documents folder. You may name the file whatever you like, but make sure you name it something that will remind you exactly what it is. This is the file extension for Microsoft’s “Personal Store File”, which is used to archive e-mail.
outlook personal folders

  • Click “Ok”, and then click “Ok” again on the Archive window to create the archive. The archive will show up below your existing folder list in Outlook in an “Archive Folders” tree. You will be able to drag mail here that you would like to back up.

Tuesday, August 20, 2013

Create a scheduled task in Windows Server 2008

  1. Log into your server through 
  2. Navigate to Start > All Programs > Administrative Tools > Server Manager. This brings you to the Server Manager interface
  3. Drill down to Configuration > Task Scheduler

  4. On the right hand side of the interface, click Create Basic Task… Give the task a name and description. Click Next

  5. Select the radio button for how often the task should run: Daily, Weekly, Monthly, one time only, when the computer starts, when I log in, or when a specific event is logged. Click Next

  6. Select a start time, how often to perform the task, and an end time. Click Next

  7. Configure the task to Start a Program, Send an e-mail, or display a message by selecting the appropriate radio button. Click Next

  8. Browse to the program or script and enter in any arguments or paths to start in. For example to run a command prompt, enter in C:\Windows\System32\cmd.exe. Click Next\
    * -s: Shutdown windows server
    * -r: Reboot windows server
    * -f: Forces all running application to exit
    * -c: Allow the shutdown to by cancel by user
    * -t: Specifies the countdown in seconds until the shutdown
  9. Select the checkbox for Open the Properties dialog for this task when I click Finish if you wish to configure the task further. Click Finish

  10. The Advanced Properties window will appear. Configure the task further to your liking by adding comments to the task, telling the task when to run (only if logged in or otherwise), deleting the task after its run if it's scheduled to not run infinitely, to reschedule the task if it is missed, and so forth. After doing so, the task is setup and will run if configured properly

Download Kalender 2021 Masehi / 1442 Hijriyah

Sumber artikel :  https://pintardesain.com/download-kalender-2021/ Download Kalender 2021 Masehi / 1442 Hijriyah File CorelDraw. Lengkap 12 ...