Tuesday, July 30, 2013

Different between remove mirror and break the mirror in Windows Server 2008 R2


(For your reference only, I only try in a VM one time to do the “remove mirror” and “break mirror”).
Remove mirror will also remove all the data on the designated mirror disk. (Disk A will keep current data, but Disk B will remove all the data and volume)
image
Break mirror will stop the mirroring of the volume, but it will keep the data in both disk. (Disk A and Disk B which creates two separate and independent volumes containing identical data)
image
Please do not try the “Remove mirror” or “Break mirror” in your production system unless you have full data backup and well prepare disaster recovery of your system. (Take your own risk)


Sumber: http://billyfung2010.blogspot.com/2012/06/different-between-remove-mirror-and.html

How to setup the software RAID 1 on Window Server 2008 R2?


Step 1: Open the “Server Manager” -> Storage -> Disk Management
clip_image002
Step 2: Select the “System Reserved” volume
clip_image002[5]
Step 3: Right click on “System Reserved” volume and select “Add Mirror…”
clip_image002
Step 4: Press “Yes” to start the disk conversion and mirroring.
clip_image002[7]
After the mirroring of the “System Reserved” volume is complete, you will see the Disk Management like the following:
clip_image002[9]
Step 5: Select the “Volume C:” and “Add Mirror….”
clip_image002[11]
Step 6: Select the disk you want to form mirror with your selected volume.
clip_image002[13]
Then wait for few hours until the mirror is complete. The following screen is the disk starting to form mirroring. There are yellow alert on Disk 1 since the mirroring is not complete.
clip_image002[15] When the mirroring is complete, you will the Disk Management like the following:
clip_image002[17]

How to boot into Windows if the Disk 0 is fail?
In the boot menu, select “Windows Server 2008 R2 – secondary plex”
clip_image002[19]
Remark: Since this is a software RAID, please do not use this setup for the mission critical system. (Use this setup for your own risk)

Sumber : billyfung2010.blogspot.com/2012/06/how-to-setup-software-raid-1-on-window.html

Monday, July 22, 2013

Exchange 2010 and Exchange 2007 recipients limit

There is an important change compared to Exchange 2003 – Distribution group are treated as one recipient.

We can restrict recipients limit at the following levels:
  • Organization
  • Transport server
  • Receive Connector
  • Mailbox
So…
Recipient limit  at the organization level, we can check this PowerShell command:
Get-TransportConfig | fl MaxRecipientEnvelopeLimit
or in EMC
Organization Configuration | Hub Transport | Global Settings | Transport Settings tab | Transport Settings Properties
Transport Settings

And we can set this limit:
Set-TransportConfig-MaxRecipientEnvelopeLimit 4000
At Transport Servers level  we can check limit by the following command:
Get-TransportServer | fl Name, PickupDirectoryMaxRecipientsPerMessage
This limit applies only to messages thrown into the Pickup Directory on transport servers. So this setting are not applied to regular mail
We can set this:
Set-TransportServer-identity ‘Server_Name’-PickupDirectoryMaxRecipientsPerMessage 100
At Receive Connector level we can check limit with following command
Get-ReceiveConnector | fl Name, MaxRecipientsPerMessage
This limit applies to messages accepted by a specific Receive Connector
We can set this limit:
Set-ReceiveConnector-Identity ‘ConnectorName’-MaxRecpientsPerMessage 200
And at the end  settings for a specific mailbox:
Get-Mailbox ‘Mailbox_Name’ | fl recipientLimits
Unlimited means that the global settings are used.
Or in the EMC  in the mailbox properties |  Mail Flow Settings tab |  Delivery Options properties
Delivery Options
We can set this:
Set-Mailbox-identity ‘Mailbox_Name’-RecipientLimits 50
And what about mailboxes  limits and the global limits ?
Mailboxes limits always take priority over the global. And not just in the case of restrictions, but also bigger recipient numbers than the global limit.
There is one other place where you should look  when determining limits. Especially in environments migrated or coexisting with Exchange 2003.
These are the  Global Settings
Run ADSIEdit connect to Configuration
Expand CN = Configuration … | CN = Services | CN = Microsoft Exchange | CN = NazwaOrganizacjEX | CN = Global Settings | choose Message Delivery properties  and find the value of msExchRecipLimit
ADSIedit
This limit can be changed by using the ESM  for Exchange 2003 or Exchange 2007 (SP1) and Exchange 2010 tools. But after changing in the ESM EX 2003  the new value is not visible in the console 2007/2010. Unfortunately, it is used!
In case of conflict, the lower limit is taken.

Exchange 2003 limit recipients

Each member of the distribution group is treated as one recipient.
We set the limit on the number of recipients in
  • Global Settings
  • SMTP Server properties
  • User Properties
Global settings
Expanding Global Settings | Message Delivery choose properties  | Defaults tab
Message Delivery Properties
SMTP Virtual Server Properties
Expand Administrative Groups | group_name | Servers | Protocols | SMTP |select  SMTP server properties | Messages tab
SMTP
USER properties | Exchange General tab | Delivery Options | Recipient Limits


Delivery Options
sumber : http://exchangeblog.pl/en/2012/09/exchange-recipients-limit/

Sunday, July 21, 2013

Export / Import Virtual Mesin pada Hyper-V

Salah satu kemudahan menggunakan virtual mesin adalah, kita dapat memindah-mindahkan virtual mesin dari satu mesin hardware (mesin yang menjalankan virtulisasi) ke mesin hardware yang lain. Hal ini tidak mudah jika anda masih menginstall sistem operasi pada mesin hardware secara langsung, untuk dapat memindahkan server pada hardware yang lain anda harus menghilangkan identitas-identitas hardware yang pada server lama terlebih dahulu, seperti processor, mainboard dan hardisk selanjutnya hardisk yang berisi sistem operasi tersebut dipindahkan ke mesin baru, selanjutnya pada server baru sistem operasi akan mengenali dan menginstall identitas hardware yang baru. Untuk menghilangkan identitas hardware anda dapat menggunakan perkakas sysprep, jika anda ingin lebih tau lebih elngkah tentang sysprep bisa kunjungi link berikut http://technet.microsoft.com/en-us/library/cc783215(v=ws.10).aspx.

Banyak alasan kenapa kita harus memindahkan virtual mesin dari mesin hardware satu ke mesin hardware yang lain seperti :
· Peremajaan mesin hardware hal ini sering terjadi pada perusahaan yang bersekala enterprise yang biasanya di lakukan setiap 3 tahun sekali.
· Upgrade komponen mesin, tidak ingin down time terjadi terlalu lama anda dapat memindahkan virtual mesin ke mesin hardware yang lain.
· Migrasi, karena sesuatu hal maka virtual mesin yang terdapat pada masin hardware A harus di pindahkan ke mesin hardware yang lain .
· Optimalisasi, ketika kita mempunyai beberapa mesih hardware yang menjalankan virtual mesin, kadang ada keadaan beban setiap mesin hardware berbeda-beda, untuk itu kita dapat memindah-mindahkan virtual mesin ke mesin hardware yang lain agar sumber daya setiap mesin hardware dapat dioptimalkan secara maksimal.
Virtualisasi menawarkan sebuah fleksibilitas yang memudahkan system administrator untuk memanajemen mesin atau server anda, selain itu juga banyak keuntungan lain yang bisa anda dapatkan seperti efiseinsi energy, optimalisasi sumber daya dan otomatisasi.
Berikut langkah-langkah untuk melakukan Export dan import pada Hyper-v :
1. Buka Hyper-V manager dari Start - Administrative Tools – Hyper-V Manager.
2. Sebelum meng-export virtual mesin, shut down virtual mesin tersebut terlebih dahulu, klik kanan pada virtual mesin tersebut misal Win2008R2STD kemudian pilih Shutdown.
3. Kemudian klik kanan pada virtual mesin Win2008R2STD tersebut lalu pilih Export.
Gambar 1
Gambar 1
4. Kemudian akan muncul jendela Export Virtual Machine, klik Browse lalu tentukan dimana file hasil proses export virtual mesin aakan di simpan misal C:\Temp, setelah itu anda bisa lagsung klik tombol Export.
Gambar 2
Gambar 2
5. Selanjutnya proses Export akan berlangsung, anda dapat melihat pada kolom Status, untuk mengetahui sudah sebarapa jauh proses export berjalan.
Gambar 3
Gambar 3
6. Untuk mengecek virtual mesin telah berhasil di export buka Windows Explorer, buka folder dimana anda tadi menyimpan hasil export virtual mesin kemudian masuk ke folder virtual mesin, akan seperti terlihat pada gambar di bawah.
Gambar 4
Gambar 4
7. Setelah selesai, langkah selanjutnya adalah memindahkan folder yang berisi file virtual mesin Win2008R2STD ke mesin yang baru (tujuan), di sarankan sebelum memindahkan file tersebut untuk melakukan kompresi misal dengan .zip
8. Selanjutnya melakukan Import virtual mesin, pada contoh ini saya sengaja mengimport pada mesin hardware yang sama, jangan lupa mengekstrak file virtual mesin jika sebelumnya di kompresi.
9. Untuk meng-import pada menu Action pilih Import Virtual Machine…
Gambar 5
Gambar 5
10. Selanjutnya klik Browse, cari dimana file virtual mesin berada kemudian klik tombol Import.
- Move or restore the virtual machine ( Use the existing unique ID) : pilihan ini di gunakan jika anda ingin mengimport virtual mesin beserta ID, tidak di sarankan jika ingin mengimport pada mesin hardware yagn sama.
- Copy the virtual machine (Create a new uniqe ID) : dengan pilihan ini anda akan mengimport virtual mesin dengan ID yang baru, bisa di lakukan jika anda ingin mengimport pada mesin hardware yang sama.
Kemudia pilihan Duplicate all files so the same virtual machine can be imported again, pilihan ini berguna jika anda ingin mengimport virtual mesin kembali, untuk menhindari gagalnya proses import pilih pilihan ini, jika terjadi kesalah proses import dan file rusak anda tidak perlu harus meng-copy kembali dari mesin yang lama.
Gambar 6
Gambar 6
11. Tunggu proses Import sampai selesai.
Gambar 7
Gambar 7
12. Muncul warning klik tombol Close, proses Import telah berhasil tetapi muncul warning hal ini terjadi karena saya mengimport pada mesin hardware yang sama, meskipun sudah memilih piliha Copy the virtual machine (Create a new uniqe ID) tetapi virtual masin yang lama belum di hapus dan kemungkinana ada persamaan nama virtual mesin, nama komputer dan mungkin juga ip address.
Gambar 8
Gambar 8
13. Setelah proses import selesai coba jalankan virtual mesin Win2008R2STD, ternayata virtual mesin dapat berjalan dengan normal, perhatikan juga virtual mesin yang lama dalam posisi Off.
Gambar 9
Gambar 9

Menambah kapasitas Hardisk pada Hyper-v

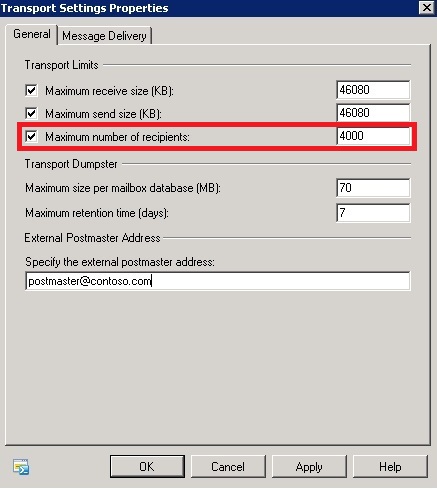
Jika pada edisi PC Plus sebelumnya penulis membahas bagaimana mengurangi atau memperkecil hardisk pada kesempatan kali ini penulis ingin membahas bagaimana menambah partisi pada hyper-V. Seperti sering kita alami ketika menggunakan komputer fisik kadangkala alokasi hardisk tidak sesuai dengan perkembangan waktu yang mana data semakin bertambah besar, tentu hal ini juga mebutuhkan ruang yang lebih besar pada hardisk. Jika pada komputer fisik kita tidak bisa mengurangi atau menambah kapasitas hardisk secara langsung, kecuali kita menambahkan hardisk baru maka pada lingkungan virtual semua itu dapat di lakukan. 

Ingat, yang penulis bahas di sini bukan menambah atau merubah partisi hardisk misal Drive C:, D: E: dan seterusnya, tetapi menambahkan kapasitas hardisk, jika ingin menambah atau menguangi partisi pada partisi hardisk (drive) anda bisa menggunakan Disk Management atau menggunakan program Partition Manager lain seperti Partition Magic, EaseUS Partition manager, Paragon Partition Manager dan lain lain. 

Bagi yang sudah biasa bekerja pada lingkungan virtualisasi pasti pernah mengalami, dimana kapasitas hardisk pada salah satu atau beberapa virtual mesin butuh kapasitas tambahan. Kebutuhan tambahan kapasitas hardisk disebabkan oleh pengalokasian kapasitas hardisk yang terlalu kecil, mungkin untuk beberapa waktu yang lalu kapasitas hardisk masih mencukupi, tetapi seiring dengan berjalannya waktu file-file semakin bertambah, database semakin membengkak dan update sistem operasi juga membuat kapasitas hardisk menjadi penuh. 

Pengalaman penulis yang bekerja pada salah satu Cloud Computing service provider, permintan penambahan kapasitas hardisk cukup sering, dari beberapa pelaggan yang awalnya membeli paket VPS dengan spesifikasi yang kecil atau sesuai kebutuhan waktu itu dengan seiring berjalannya waktu bisnis mereka semakin berkembang dan beban VPS semakin bertambah, semua itu tentu membutuhkan resource yang lebih seperti Memory, Core Processor dan kapasitas Hardisk itu sendiri.
Pada tutorial ini penulis ingin menambahkan kapasitas hardisk pada salah satu virtual mesin dengan sistem operasi Windows 7, awalnya virtual mesin ini hanya mempunyai kapasitas hardisk 127 GB kemudian panulis mengubah kapasitas hardisk menjadi 150 GB. 

1. Berikut tampilan hardisk pada virtual mesin Windows 7 dengan kapasitas awal 17 GB.
Gambar 1
Gambar 1

2. Untuk dapat menambahkan kapasitas hardisk, Shutdown Virtual mesin terlebih dahulu. Proses shutdown bisa dalam virtual mesin atau dari Hyper-V manager.
3. Kemudian pada Komputer Host buka Hyper-V manager, dari menu Start – Administrative Tools Plih Hyper-V Manager.
4. Pada Hyper-v Manager klik kanan pada virtual mesin yang di maksud kemudian pilih pilihan Settings…. 

Gambar 2
Gambar 2
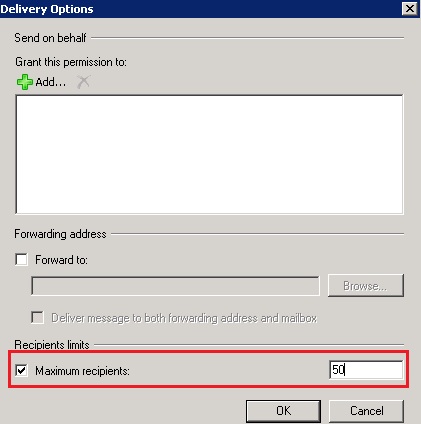
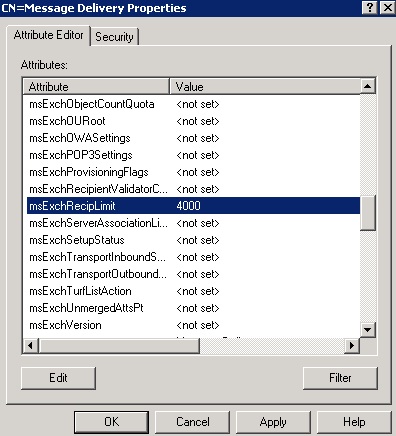
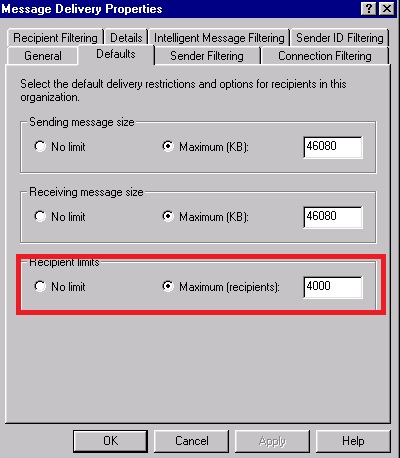
5. Pada halaman Settings, pilih menu IDE Controller kemudian pilih hardisk yang di maksud kemudian klik tombol Edit. 

Kebetulan pada gambar di bawah hanya terdapat satu hardisk jika terdapat beberapa hardisk pada menu IDE Controller 0 atau IDE Controller 2 atau juga pada SCSI Controller akan ada beberapa Hard drive, pastikan Hard Drive yang akan di tambah kapsitasnya yang terpilih. 

Gambar 3
Gambar 3
6. Muncul halaman Edit Virtial Hard Disk Wizzard, pada Choose Action, karena kita ingin menambahkan kapasitas Hardisk maka pilih opsi Expand kemudian klik tombol Next.

Gambar 4
Gambar 4

7. Pada halaman Configure Disk di sini anda dapat menentukan besaran kapasitas hardisk yang baru. Pada contoh di bawah penulish mengisikan New size: 150 GB dari kapasitas sebelumnya Current size is 127 GB kemudian klik tombol Next, berarti di sini penulis menambahkan kapasitas hardisk sebesar 23 GB. 

Gambar 5
Gambar 5

8. Kemudian pada halaan Summary, klik tombol Finish.

Gambar 6
Gambar 6

9. Sampai di sini proses penambahan Hardisk telah selesai, tetapi kapastias yang kita tambahkan belum bisa di gunakan oleh pengguna, kita perlu mengekspannya terlebih dahulu sebelum dapat di gunakan.
10. Buka Disk Management, dari menu Start klik kanan pada Computer kemudian pilih Manage.
Gambar 7
Gambar 7

11. Pada halaman Disk management, perhatikan pada Disk 0, 23 GB kapasitas hardisk yang di tambahkan tadi masih dalam status Unallocated, langkah selanjutnya yaitu mengekspand drive C agar menjadi 150 GB.
Selain mengekspan Drive C anda juga dapat membuat partisi baru pada kapasitas hardisk yang kita tambhakan tadi. 

Gambar 8
Gambar 8

12. Untuk mengekspan Drive C, klik kanan pada Drive C kemudian pilih Extend Volume….
Gambar 9
Gambar 9
13. Muncul halaman Welcome to the Extend Volume Wizzard kemudian klik tonbol Next.
14. Pada halaman Select Disks, secara default semua kapasitas hardisk yang kita tambahkan langsung di tambahkan semua, terlihat pada kolom Selected kemdudian klik tombol Next.
Jika anda ingin hanya sebagian kapasitas hard disk di tambahkan pada Drive C dan sisanya ingin di jadikan partisi baru, anda pat mengedit nilai paa Select the amount of space in MB lebih kecil, kemudian sisanya anda dapat jadikan partisi sendiri.

Gambar 10
Gambar 10
15. Muncul halaman Completing the Extend Volume Wizzard klik Finish.
16. Penambahan kapasitas hardisk telah selesai, klik kanan pada drive C kapasitas hardisk telah menjadi 150 GB dan sudah tidak terdapat lagi partisi unallocated. Selanjutnya pengguna dapat bekerja dengan kapasitas hardisk yang baru
Gambar 11
Gambar 11

Saturday, July 20, 2013

Restricting users to send and receive external messages in Exchange Server 2007

Introduction
For the sake of this article, I created a fictitious organization which I will name MSExchange.org, and a user-name which I will name Anderson.Patricio. Through this article we are going to manage the users ability to send or receive internet messages. These are some of the topics that we are going to cover in this article:
  • Block any incoming mail to that user
  • Block that user from sending outbound messages
  • Allow that user to send messages to a specific user outside
  • Allow the user to receive external messages from a specific domain
  • Allow that user to send messages to a specific domain only
The main idea here is to provide some possible ways to accomplish this kind of task, for your personal environment or for the entire network. You can also combine more than one of the possible scenarios above to accomplish your requirements.
Managing the inbound traffic to a specific user
There are several ways to manage the incoming traffic to a specific user. We can create Transport Rules, configure Recipient Filtering, change at mailbox level and so on.
The first option is to use Transport Rules. This feature allows us to create a rule to return a NDR to the sender, for example, saying that this specific user does not have permission to receive Internet mail. This can be done as follows:
  1. Open Exchange Management Console
  2. Expand Organization Configuration
  3. Click on Hub Transport
  4. Click on Transport rules tab
  5. On Toolbox Actions, click on New Transport Rule…
  6. In the Introduction page, define a name for the rule and click Next
  7. In the Conditions page. Select the from users inside or outside the organization item and sent to people item as well. In the step 2 box, you can define the previous items’ value. To do this, make sure that the Outside value is selected for the first one and for the second one you added the user mailbox that will not be able to receive Internet mail. When done, click on Next
  8. In the Actions page, select the option send bounce message to sender with enhanced status code, you can go to Step 2 box, and change the text of the message and status code as well. (Figure 1)

Figure 1
  1. In the Exceptions page. Let’s just click on Next, New and Finish.
A second option is using Recipient Filtering anti-spam agent, it is enabled by default in an Edge Transport Server. However, if you are using the Hub Transport role to receive internet mail you need to enable the Anti-Spam Transport Agents, you can find how to do that in this following MSExchange.org article.
Either way, the process to configure the Recipient Filtering is very similar to the previous one. We are going to cover those changes in a Hub Transport, which are as follows;
  1. Open Exchange Management Console
  2. Expand Organization Configuration
  3. Click on Hub Transport
  4. Click on Anti-spam tab
  5. Double click on Recipient filtering
  6. Click on Blocked Recipients tab
  7. Check the Block the following recipients option and type in the internal users that you want blocking Internet mail (Figure 2)

Figure 2
The result, as you may expect, is that any message sent from the Internet to anderson@msexchange.org will return a NDR saying that the user does not exist in our organization.
Well, sometimes blocking external incoming traffic to a user is not enough and you want to make the restriction a little tighter. Restricting a user to only receive messages from his boss and no other email client is one such example.
Note:You can also accomplish this requirement by using Transport Rules, however the objective of this article is to give extra options and so, I opted to configure it at mailbox level.
The configuration process is as follows:
  1. Open Exchange Management Console
  2. Expand Recipient Configuration
  3. Click on Mailbox
  4. Double click on the mailbox that you want to restrict
  5. Click on Mail flow settings tab
  6. Click on Message Delivery Restriction and click on Properties
  7. On this page, we are able to restrict the user to accept or reject message from specific users. This user can only accept messages from authenticated users (Figure 3)
Note:
Any message coming from the Internet is not authenticated.

Figure 3

Managing outbound trafficSo far we have seen several ways to block inbound traffic directed towards specific internal users, now it is time to block their ability to send internal/external messages. When we speak about restriction, we are speaking about the Hub transport architecture combined with Transport Rules, which when combined do a great job in this sort of management. Therefore, a simple and easy way to mange outbound traffic is by using Transport rules, and this is how you set it up:
  1. Open Exchange Management Console
  2. Expand Organization Configuration
  3. Click on Hub Transport
  4. Click on Transport rules tab
  5. On Toolbox Actions, click on New Transport Rule
  6. In the Introduction page. define a name for the rule and click on Next
  7. In the Conditions page, select the from people item and from people inside or outside the organization item. In the Step 2 box you can define the previous items values, make sure that on the first one (from people link) you selected all users that are not allowed to send messages out, and on the second one the value Outside is selected
  8. In the Actions page, select the option send bounce message to sender with enhanced status code, you can go to Step 2 box and change the text of the message and status code as well. In this case we are going to change the text to “You are not allowed to send external messages". (Figure 4)

Figure 4
The result will be that any message sent by our test user will generate an NDR on his mailbox and the end-user will be able to see the information about the internal policy that we have just added in our Transport rule (Figure 5).

Figure 5
Dealing with exceptions…
Deploying rules in your organization is really nice but we already know that there is always something and/or some exception which must be created down the road. Technically speaking it is not a big deal and it is included during the transport rule creation process.
However, if you look closely at all the transport rules that we have created so far, there is no built-in rule to allow an internal user to send messages to a specific external domain. You do have the option to create a contact and specify that contact in the exception but it is not possible to do that when the requirement is an entire domain. Let us say that the requirement is that an internal user is able to send messages to any recipient at either Microsoft.com or live.com, well that is a big deal because if the users has a lot of contacts on those domains the contact creation will be painful and unmanageable.
Let us edit the transport rule that we created to block external messages from our organization, and instead select the item except when the text patterns appears in a message header in the Exceptions page. Click on the message header link; type in TO and click on the text patterns link and finally, type in @domain.com$ (where @domain.com can be substituted by any domain that you have in your requirements).
We are going to use a RegEx expression to match the domain(s) that we want to be accepted from our current transport rule. When you see the expression “@domain.com$”, any text that contains that string will be matched, for example: user1@domain.com, userXX@domain.com. However if the user tries user1@domain.com.fr it would not work.
The exception that we added to the transport rule in order to allow internal users to send messages to a specific domain can be seen in the Figure 6.

Figure 6
Now, using the concept we have just seen, we can create an exception for the Inbound Internet mail by editing the existent transport rule and adding the item except when the text patterns appears in a message header item in the Exceptions page. Then, you need to add the text “FROM” on the message header link, and in the list of the domains accepted using the same pattern that we used before (@domain.com$). A summary of this change can be seen in the Figure 7.

Figure 7
These exceptions were created using Transport Rules. If you have in place Sender Filtering or mailbox settings they would not be applied. Keep that in mind when you create your plan to deploy this kind of restriction in your environment.
Conclusion
In this article we went over some of the tasks that an administrator can perform to restrict inbound and outbound traffic in Exchange Server 2007.

sumber :
http://www.msexchange.org/articles-tutorials/exchange-server-2007/management-administration/restricting-users-send-receive-external-messages-exchange-server-2007.html

Wednesday, July 17, 2013

Exchange 2010 DAG Step by Step - Two Member DAG in Two AD Sites article

My Server setup details as follows.
Server Description Server Name IP Address Operating System Application
Domain Controller dc.doitfixit.local 192.168.1.100 Windows Server 2008 R2 SP1
Standard Edition

Exchange CAS/HUB server cas.doitfixit.local 192.168.1.101 Windows Server 2008 R2 SP1
Standard Edition
Exchange Server SP2
Exchange Mailbox Server ex1.doitfixit.local MAPI: 192.168.1.102
Replication: 10.1.10.10
Windows Server 2008 R2 SP1
Enterprise Edition
Exchange Server SP2
Exchange Mailbox Server ex2.doitfixit.local 192.168.1.103
Replication: 10.1.10.11
Windows Server 2008 R2 SP1
Enterprise Edition
Exchange Server SP2
As shown in above table I am using separate network for Exchange Mailbox Replication. Also keep in mind Windows Server Enterprise Editions are required for configure DAG because it starts "Cluster Service" which required Enterprise editions of Windows servers.
Lets start the configuration.
First we have to configure the both network settings in our Exchange Mailbox servers. For more information regarding Network Configuration of configuring DAG refer this article at Technet.
See network settings of ex1.doitfixit.local exchange mailbox server below.
MAPI Network

Replication Network

Remove "Register this connection's addresses in DNS" tick.

Do the same changes to other exchange server also.


We have configured each NIC in both Exchange Mailbox servers. Now we have to bring the MAPI network to top of the Bindings order. To do this press the ALT key, and then select Advanced > Advanced Settings.

Use arrows to move the MAPI network to top of the connections.

We have DB01 Mailbox database in EX1 server and DB02 in EX2 server.

Lets start the Database Availability Group configuration
See Part II of this article from below link

To do this click "New Database Availability Group" in the Mailbox node in Organization Configuration in Exchange Management Console.
When create a DAG we should specify Witness Server which is used to establish a majority node set. Its recommended to use Hub Transport Server as a witness server. But if you decide to choose other server as a witness server you must add the "Exchange Trusted Subsystem" group to the local administrators group on that server. More witness server requirement refer this Technet article.
Specify DAG Name, Witness Server and the Witness Directory as shown in below figure.


Lets add Exchange servers to this Database Availability Group. To do this click "Manage Database Availability Group Membership...".

Add Exchange Servers.

Click Finish.


if you do not have DHCP available on your network while the member servers are being added to the DAG, you will get the warning saying that "The network name "DAG01" is not online. Please check that the IP address configuration of the Database Availability Group is correct."". So if you do not have DHCP enabled in your network, you can manually assign IPs for the DAG. To do this go to properties of the DAG01 and click "IP Addresses" and add IP addresses for the group.


If your DAG Group contains exchange servers which are in different networks (Subnets) you should add all IP addresses to this list. See the "DAG Name and IP Address Requirements" section in this TechNet article.


Now I am renaming my DAG networks as MAPI and REPLICATION for easy use. Also we can Enable/Disable Replication on each networks.


To get Database Availability Group details through Exchange Management Shell run below command.
Get-DatabaseAvailabilityGroup | FL


Lets see the status of "cluster core resources". Open "Failover Cluster Manager"


Check the status of Cluster Core Resources


Let's add database copies for each mailbox servers. Also note that all copies of a database must use the same path on each server containing a copy.


Select other Mailbox Server name and click Add.


Click Finish.


Do the same steps for all Mailbox Databases. Now you can see the copy status of Mailbox Database.


Now I am disconnect the EX2 Exchange server from the network. Now you can see DB02 database is mounted to EX1 exchange server.


Source : 

http://www.doitfixit.com/index.php?option=com_content&view=article&id=137:exchange-2010-database-availability-groups-dagdag-step-by-step-how-to-configure-dag-step-by-step&catid=34:exchange-2010&Itemid=53  

Download Kalender 2021 Masehi / 1442 Hijriyah

Sumber artikel :  https://pintardesain.com/download-kalender-2021/ Download Kalender 2021 Masehi / 1442 Hijriyah File CorelDraw. Lengkap 12 ...