Friday, November 22, 2013

Unable to initialize the Information Store service

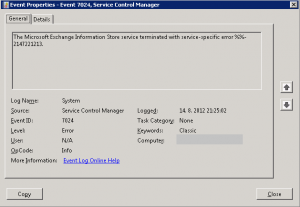
One Exchange 2010 server didn’t mount databases after each reboot. When I looked to Event viewer I saw following events:
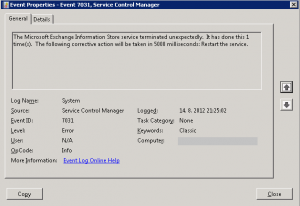
The Microsoft Exchange Information Store service terminated with service-specific error %%-2137221213
and also
The Microsoft Exchange Information Store service terminated unexpectedly.
These System events are not really usefull. So I’ve looked into Application events and I saw following event:
Unable to initialize the Information Store service because the clocks on the client and server are skewed.
And now we know what the problem is. When I looked at the time on Exchange server and domain controller time looked the same. Weird. :-)
After couple minutes of looking into events I found events saying about time synchronization with domain controller. Difference before synchronization was 7 minutes. When I restarted service Microsoft Exchange Active Directory Topology Service all databases mounted correctly.
Exchange mailbox server is virtual machine (VM) in VMWare. And that was a problem. When VM is starting it gets time from ESX server on which VM is running. And that was a problem. ESX server had bad time set. When mailbox Exchange server was starting it aquired bad time from ESX server. VM begun starting services and also Exchange services. Then mentioned services couldn’t start because of time difference between DC and VM. After couple minutes clock got synchronized from DC, but Exchange services didn’t notice that.
So solutions for these problems:
  • synchronize times on ESX and DC from same source
  • don’t let VMTool to synchronize time on VM
  • to force synchronize time using command: Net time \DomainController /Set
  • by restarting service Microsoft Exchange Active Directory Topology Service time is also checked and also authentification re-established
This problem was caused probably by forcing Kerberos ticket time difference by default to 5 minutes.

sumber : http://www.cievo.sk/2012/08/16/unable-to-initialize-the-information-store-service/

Wednesday, October 23, 2013

Configure HP Integrated Lights Out (ILO) Step by Step

logoilo.jpgEasily one of the best features of HP servers is their Integrated Lights Out (ILO) remote management interface. Having the ability to remotely access HP servers from POST to OS is an invaluable tool. Standard ILO features include remote shutdown and startup, virtual media, text mode console redirect and access to hardware logs, status and diagnostic tools. Full graphical remote console redirection is available with the advanced license. This article will outline step by step how to configure and access ILO on a fresh out the box Proliant ML350 G5 server.
First, connect the ILO designated network port to your switch or management network.
ilonicports.jpgMost brand new HP servers come with an information tag attached. Printed on the tag is the server serial number and Integrated Lights Out access information including factory set username and password.
ilotag.jpgThe easiest way to access the ILO configuration utility is during the POST by pressing F8 when prompted.
ilo2.PNGThe menu is straightforward and self explanatory. Use the arrow keys to navigate. Select Enter while the Set Defaults option is highlighted to revert back to factory settings.
First, access the Network menu, disable DHCP and change the DNS name
ilodhcp.jpgThen configure your static ip settings
ilostaticip.jpgNext, set the Administrator password or create new user.
ilouser.jpgNote that the username and password are both case sensitive. Select Exit to save and reset ILO with the new settings. Test access to the ILO web interface.
iloweblogin.jpgChecking DHCP leases and configuration from the server OS are some alternate setup options if your server is already in production and the ILO settings were not configured beforehand. If DHCP is accessible from the ILO interface connected network then check the leases for the DNS name printed on the tag. Use the leased ip to access the web interface and login with the factory username and password. All the same settings from the POST utility can be configured through the ILO web interface. HP also provides a utility called HPONCFG which allows for command line interaction with ILO and scripting functionality. Read more about it here . Comments or questions welcomed.

sumber : http://808techblog.com/?p=32

Windows - "The trust relationship between this workstation and the primary domain failed"

Windows - "The trust relationship between this workstation and the primary domain failed"


Problem

Seen on Windows clients in a domain environment.
The trust relationship between this workstation and the primary domain failed

What's Happened?

Put simply, just like you have a password for your user account, the computer you log onto also has a password (you just never see it), it gets reset (by default) every thirty days, and all this runs in the background. For a lot of different reasons the computer password has got "Out of Sync" between the computer and the domain controller.

Solution

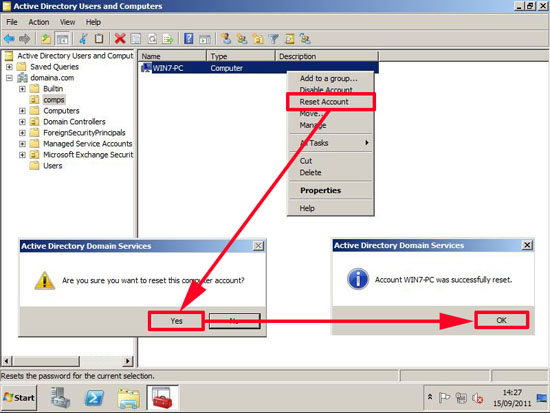
1. Firstly, lets try and reset the password, on your domain controller, in administrative tools, launch "Active Directory Users and Computers" > Find the computer object that is having problems > Right click > Reset Account.
reset computer account
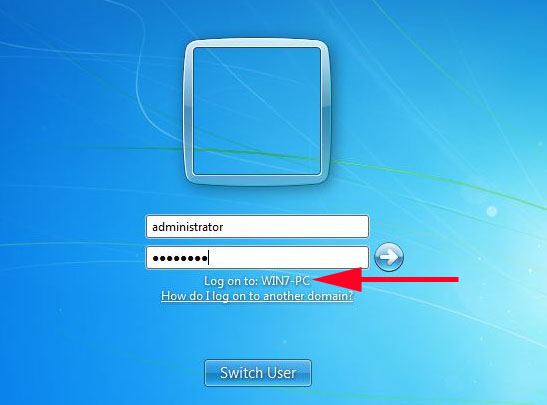
2. Then try to login again (to be honest this usually does not work!). If it does then stop reading and have a nice day. Go back to the broken machine (remove any network cables, and turn off Wireless etc, so it has no network connections) > Try either to login with an administrative account, or log in as the local administrator (or an account that has local administrative privileges).
Note: On Windows 7 the local administrator account is usually disabled, if you forgot the password or need it enabling you will need to do the following...
Windows Administrator "Lost Password" / "Password Reset"
local admin login
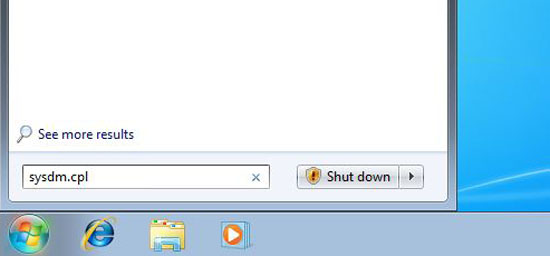
3. In the Search/Run box type sysdm.cpl {enter}.
sysd.cpl
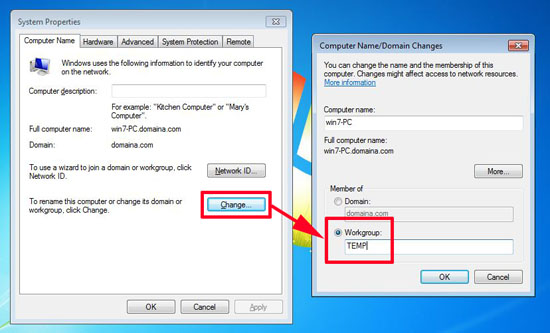
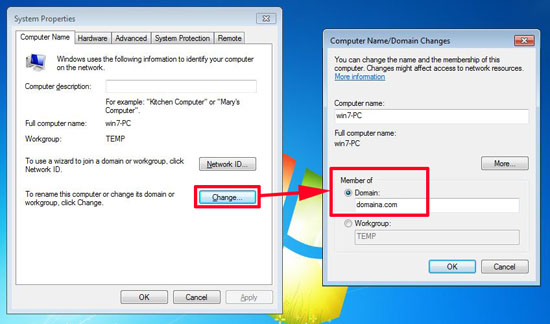
4. On the Computer Name tab > Change > In the workgroup section type in TEMP > OK.
Note: If leaving the domain is NOT an option, i.e. you have this error on a mission critical server, of you fear leaving the domain might break something, go to the end and see how to fix the problem with netdom.
change workgroup
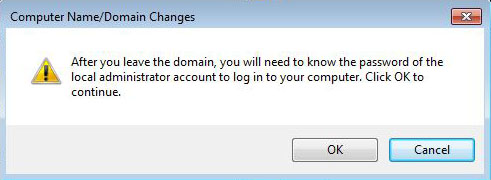
5. Take note of this Warning! - If you just logged on as the local admin then you know the password, if you DONT then reset it FIRST (Don't reboot this machine till you either know or have changed the password to a password you know). Note: To reset > Right click computer > Manage > Local Users and Groups > Users > Right click administrator > Reset Password. Warning over click OK.
need local admin
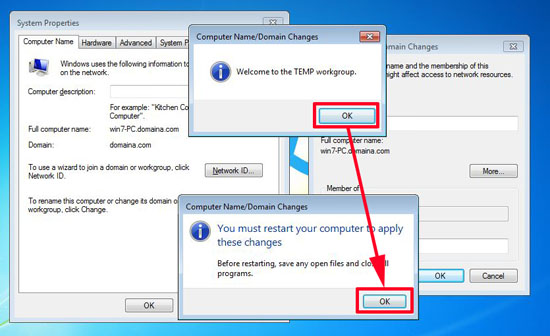
6. OK > OK > Close > Reboot.
join workgroup
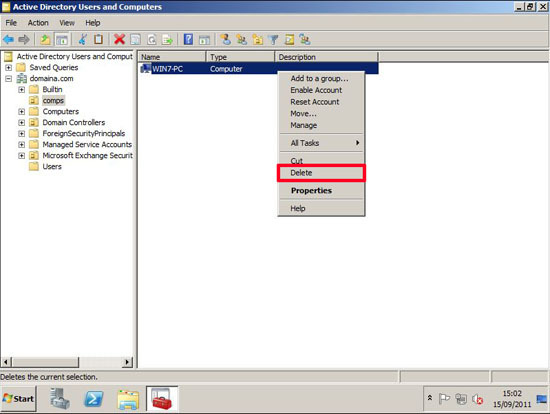
7. Back at the domain controller > in administrative tools, launch "Active Directory Users and Computers" > Find the computer object that is having problems > Right click > Delete.
Note: if you don't have access to the domain controller > you can rename the PC when it's rebooted so it has a different computer name, if you do that then skip this step.
delete computer account
8. Run sysdm.cpl again and re-join your domain again.
delete computer account
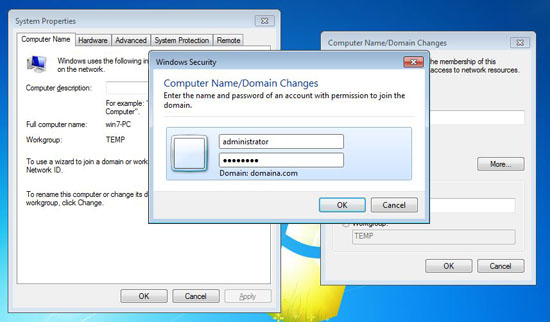
9. Supply domain credentials Note: I've used the domain admin account here but a domain user can join up to 10 machines to a domain.
join domain
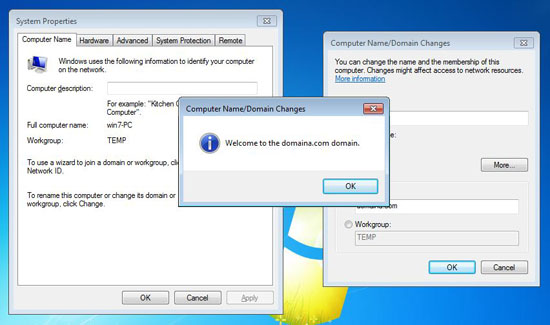
10. All being well (providing the password was correct and your DNS works) you should join the domain and need to reboot again. Post reboot the computer password will be reset.
welcome to domain

Using NETDOM to fix the trust relationship

Sometimes leaving the domain is NOT an option, if that's the case, remove all network cables form the affected machine (remember wireless ones as well). Then log on (you should be able to log on as either the local administrator, or a domain user that has 'cached credentials'.
The issue the following command;
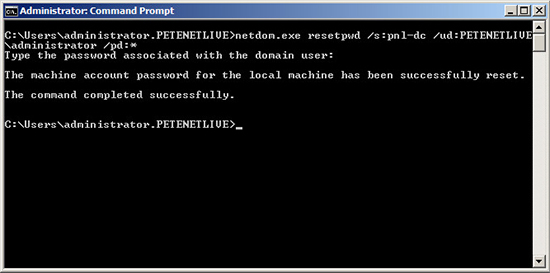
netdom.exe resetpwd /s:{domain controller name} /ud:{username} /pd:*
User netdom to reset computer password
Note: Windows 7 does not have netdom (by default). You need to install the RSAT, Turn Windows features on or off > Remote Server Administration Tools > Role Administration Tools > AD DS and AD LDS Tools > AD DS Tools.

Sumber : http://www.petenetlive.com/KB/Article/0000504.htm

Wednesday, October 16, 2013

RAID (Redundant Array of Independent Disks)

RAID (Redundant Array of Independent Disks)


Redundant Array of Independent Disks pertama kali diperkenalkan oleh David A. Patterson, Garth A. Gibson dan Randy Katz dari University of California, Berkeley pada tahun 1987.
RAID pada saat ini dimanfaatkan untuk tempat penyimpanan data yg dapat diandalkan (backup), dan meningkatkan performa kecepatan transfer data itu sendiri. Perbedaan arsitektur RAID sendiri diakhiri dengan angka (RAID 0, RAID 1, etc).

What is a RAID-Ready system?
RAID ready system adalah mengubah drive non-RAID Serial ATA (SATA) menjadi SATA RAID drive tanpa perlu menginstall Operating System.
Disini saya akan membahas arsitektur RAID yang banyak dipakai (didukung oleh Intel Matrix Storage Manager).

RAID 0 (striping)
Raid 0 digunakan oleh 2 atau lebih hard drives dengan performa read/write maximum. Data dalam RAID 0 volume disusun menjadi banyak block-block dan dibagi ke semua drives hingga drives berjalan secara parallel. Teknik ini banyak diketahui dengan nama "Striping". RAID 0 adalah yang tercepat diantara semua RAID levels, terlebih dalam membaca dan menulis file-file yang besar ukurannya.
Hard drives yang terdapat pada RAID 0 digabungkan menjadi 1 volume dan muncul sebagai 1 virtual drive di operating system. Sebagai contoh, 400 GB hard drives dalam RAID 0 array akan muncul sebagai 1 hard drive berukuran 800 GB pada operating system.
Tidak ada redudansi informasi yang tersimpan pada RAID 0 volume. Berarti jika 1 hard drive rusak, semua data pada semua drives yang ada di RAID 0 volume ini akan hilang. RAID 0 sangat tidak disarankan dipakai pada server yang mementingkan data backup.

Minimum Disks: 2
Advantage: Highest transfer rates
Fault-tolerance: None - if one disk fails all data will be lost
Application: Typically used in desktops and workstations for maximum performance for temporary data and high I/O rate

RAID 1 (mirroring)
RAID 1 array memanfaatkan 2 hard drives dimana data yang diisikan pada 2 hard drives itu diduplikasi secara bersamaan dengan data yang sama. Karena semua data diduplikasi, maka volume yang ada pada RAID 1 sama sengan ukuran volume salah satu hard drivenya.
Sebagai contoh, 2 hard drives berukuran 400 GB pada RAID 1 array akan muncul sebagai 1 hard drive berukuran 400 GB di operating system.
Keuntungan utama RAID 1 adalah backup data yang dapat diandalkan. Disaat 1 hard drive rusak, semua data segera akan terdapat pada hard disk lainnya. Disaat hard disk rusak, computer system akan dapat berfungsi sepenuhnya tanpa ada gangguan sehingga produktivitas tidak akan terganggu.
Performa pada RAID 1 array lebih baik daripada memakai 1 drive karena data dapat dibaca dari berbagai disks (original and the mirror secara bersamaan). Tetapi untuk write pada disk tidak ada perubahan yang signifikan karena data pertama kali harus di write pada 1 drive, baru pada hard drive lainnya.

Minimum Disks: 2
Advantage: 100% redundancy of data. One disk may fail, but data will continue to be accessible. A rebuild to a new disk is recommended to maintain data redundancy.
Fault-tolerance: Excellent - disk mirroring means that all data on one disk is duplicated on another disk.
Application: Typically used for smaller systems where capacity of one disk is sufficient and for any application(s) requiring very high availability.

RAID 5 (striping with parity)
RAID 5 array memanfaatkan 3 atau lebih hard drives dimana data dibagi menjadi blocks dan dinamakan strips. Parity adalah sebuah metode untuk membuat data yang telah hilang dari 1 hard drive, yang akan meningkatkan toleransi pada kesalahan. Data dan parity distrip pada semua hard drives di dalam array. Parity sendiri akan distrip dengan cara rotating sequence untuk mengurangi bottlenecks.
Kapasitas RAID 5 array adalah jumlah semua hard drives dikurangi 1 dan dikalikan pada ukuran drive terkecil. Pengurangan 1 hard drives tersebut adalah untuk menyimpan informasi parity. RAID 5 punya fault tolerance sebesar 50% dibandingkan RAID 1 yang 100%.
Sebagai contoh, 3 hard drives berukuran 400 GB dalam RAID 5 akan muncul sebagai 1 hard drive berukuran 800 GB pada operating system.
Keuntungan utama RAID 5 adalah kapasitas yang lebih besar dan proteksi data. Karena parity digunakan untuk perlindungan data maka hanya 75% total kapasitas drive yang dapat digunakan. Jika 1 drive rusak maka drive yang rusak dapat diganti dan data dapat dibangun kembali. Tetapi tambahan pekerjaan saat mengkalkulasi data yang hilang akan menurunkan performa penulisan saat data sedang dibangun kembali.
Read performa pada RAID 5 array lebih baik daripada 1 drive Karena data dapat dibaca dari multiple disks secara bersamaan. Akan tetapi, wirte performa pada RAID 5 volume tidak menghasilkan perbedaan yang besar karena parity harus dikalkulasi dan ditulis pada semua drives.

raid6.gif
Minimum Disks : 3
Advantage : Higher percentage of usable capacity and high read performance as well as fault-tolerance.
Fault-tolerance : Excellent - parity information allows data to be rebuilt after replacing a failed hard drive with a new drive.
Application : Storage of large amounts of critical data.

RAID 10 (1+0, Striping & Mirroring)
RAID 10 array menggunakan 4 hard drives untuk menciptakan kombinasi dari RAID 0 dan 1.
Saat semua data di RAID 0 array diduplikasi , kapasitas RAID 10 adalah ukran dari RAID 0 array.
Sebagai contoh, 4 hard drives berukuran 400 GB dalam RAID 10 array akan muncul sebesar 800 GB pada operating system.
Keuntungan utama pada RAID 10 adalah menggabungkan performa pada RAID 0 dan RAID 1 duplikasi data. Ini menjanjikan penyimpanan data yang dapat diandalkan. Pada saat 1 hard drives rusak, semua data secara segera akan terdapat pada ½ mirror yang ada tanpa kerusakan. Keunggulannya sama persis dengan RAID 1, system akan terus berjalan tanpa tertunda dan data2 yang hilang dapat direplace kembali dengan mengganti hard drive.
Performa pada RAID 10 lebih baik daripada memakai 1 drive karena data dapat dibaca dari multiple disks. Jika dibandingkan dengan RAID 0, RAID 10 read performance lebih tinggi karena data dapat dibaca pada ½ mirror tersebut. Tetapi wirte performance lebih rendah karena memakai RAID 1 jadi harus menunggu data di RAID 0 selesai baru diduplikasi pada RAID 1(Andy/Fus).

raid11.gif

Minimum Disks: 4
Advantage: Combines the read performance of RAID 0 with the fault-tolerance of RAID 1.
Fault-tolerance: Excellent - disk mirroring means that all data on one disk is duplicated on another disk.
Application: High-performance applications requiring data protection, such as video editing.
Secara jujur saya paling pusing ketika menulis artikel ini pada RAID 5 tapi setelah dipelajari bener2 akhirnya ngerti juga =))
dan sekiranya ada yg punya pengetahuan ttg RAID 2-4 dan 6-9 tolong ditulis disini yah :P

Thursday, September 26, 2013

How to Enable or Disabled Name Auto Complete in Outlook 2010

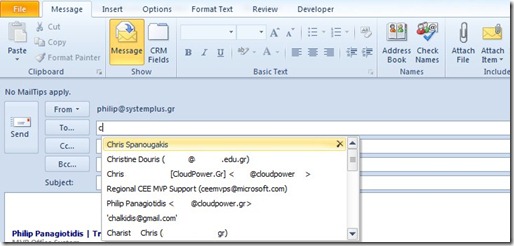
Many times we type in an e-mail address in the fields To:, Cc:, Bcc:, we notice Outlook suggesting different addresses according to the letter that we have typed. This function to some people may seem very useful and to some very annoying. In the image below I have typed the letter c and straight away the suggested addresses appear where we just select with our mouse the name that we want to, and straight away the whole recipients address is imported to the according field that we had selected.
 
00

Further down I will describe how can we Enable or Disable the AutoComplete function:
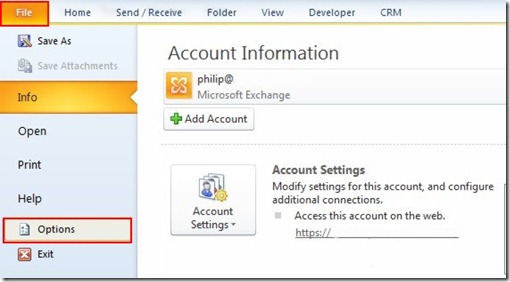
1. Once I have started Outlook 2010, I select the File Tab, so we can go in backstage view and from the menu with the available options I select the Options command as shown in the image below.
01
2. Immediately the Outlook Options window appears, where on the left where all the categories are we should select the Mail category as we can see in the image below.
02
3. Once we have selected the Mail category from the Outlook Options window we navigate further down in the window until we locate the Send Messages category at the right of the window, where we should enable or disable the command Use Auto Complete List to suggest names when typing in the To, Cc and Bcc Lines”.  That’s just about it.
03
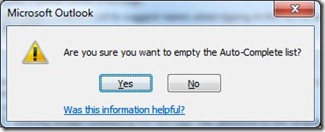
We also can clean the Auto-Complete list just by selecting the button Empty Auto-Complete List. Once we press the button a Warning Dialog Window will appear asking us whether we are sure or not to empty it, by clicking on the appropriate buttons Yes or No.
04

Wednesday, September 11, 2013

The User Profile Service failed to logon

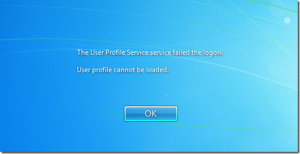
Got this message on a client workstation last week. It was running managed Symantec Endpoint Protection client 12.1…so much for that. The message is caused by a clever virus/worm/malware application which makes a small change in the Windows 7 registry and voila users can’t log in anymore…all they get is the following message when they attempt to log in with their username/password:

[The User Profile Service service failed to logon.]
[User profile cannot be loaded.]

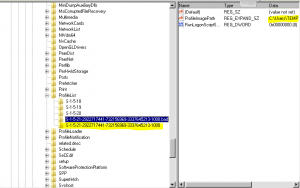
Further analysis of the registry shows that the user accounts in HKEY_LOCAL_MACHINE\SOFTWARE\Microsoft\Windows NT\CurrentVersion\ProfileList have been copied, the modified and the original renamed by an appended “.bak”. The modification essentially points to a hard drive location which does not exist or worse yet, exists with a profile that upon login displays a message stating you must pay money to get your files back.
There’s a Microsoft KB article on this as well with steps on how to fix this here, but I found these steps faster and easier:
[step 1] Boot to safe mode by mashing the F8 key repeatedly during a reboot until you see startup choices.
[step 2] You should be able to log in as the previously disabled user…if not, fire up safe mode with command prompt and type net user administrator /active:yes to enable the administrator account. Then start over from [step 1] but log in as Administrator instead of the disabled user account.
[step 3] Open Regedit and locate HKEY_LOCAL_MACHINE\SOFTWARE\Microsoft\Windows NT\CurrentVersion\ProfileList.
[step 4] Locate any keys with .bak appended to them and find their duplicates minus the .bak. Rename those keys to .old and then rename the keys with .bak such that just the “.bak” is deleted.

if [step 4] is too confusing and/or does not resolve the problem, try:
  • Find two folders starting with S-1-5 followed by same long numbers and one of them ended with .bak.
    1. Right click the folder without .bak and choose Rename. Then add .ba at the end of the folder name.
    2. Right click the folder with .bak and choose Rename. Then remove .bak at the end of the folder name.
    3. Right click the folder with .ba and choose Rename. Then change the .ba to .bak at the end of the folder name.
  • If you have only one folder starting with S-1-5 followed by a long numbers and ended with .bak. Right click the folder and choose Rename. Then remove .bak at the end of the folder name.
[step 5] Choose the folder without .bak, in the right pane, double click RefCount and type 0 (zero) and then click OK.
Choose the folder without .bak, in the right pane, double click State and type 0 (zero) and then click OK.
[step 6] Close regedit and Reboot.
That’s it. You should now be able to log back into your system using your standard username/password. I’d also recommend running a full antivirus scan.

sumber : davidvielmetter.com/tips/the-user-profile-service-failed-to-logon

Wednesday, September 04, 2013

Windows 2008 Server - File Server Resource Manager - Configuring Email Notification Error


When I try to set the Email Notification in FSRM I get the following error after clicking on Send Test Email button:
 
Failed to send the test e-mail sue to the following error: Cannot send the email due to an error. Check the application event log for more information.
 
 
My company Email Server is Microsoft Exchange 2010 SP2. This error comes up because I try to send an email from a server not recipient and also without any authentication .
 
Solution:
I created a receive connector on Exchange Server -> Server Configuration -> Hub Transport as below:
  • In the Introduction Page of creating New Connector, define a name for connector and select the Custom for Intended use for this Receive Connector and click Next.
  • In Local Network Setting page, leave the defaults and click Next.
  • In Remote Network Setting page, click on Edit button and enter the FSRM server IP Address into Start Address field  and Subnet Mask of server in End Address Filed and click ok then click Next.
  • Click NEW  in next page and click Finish in final Page.
  • Right click on the connector and click on Properties.
  • Select Permission tab and check the Anonymous Users. Then click on ok .
 Finally I check the FSRM server again and click on Send Test E-mail. The problem solved.
 
 
Sumber : http://iportal.hedcoint.com/ICT/TBlog/Lists/Posts/Post.aspx?ID=237

Tuesday, September 03, 2013

Install Telnet Client

Telnet Client is not installed by default on Windows 7, Windows Server 2008 R2, Windows Vista, or Windows Server 2008. The procedures to install Telnet Client vary based on the operating system you are using:
Membership in the local Administrators group, or equivalent, is the minimum required to complete this procedure.

On Windows 7, Windows Server 2008 R2, Windows Server 2008 or Windows Vista you can use the following command line procedure to install Telnet Client.
  1. Open a command prompt window. Click Start, type cmd in the Start Search box, and then press ENTER.
  2. Type the following command:
    pkgmgr /iu:"TelnetClient"
  3. If the User Account Control dialog box appears, confirm that the action it displays is what you want, and then click Continue.
  4. When the command prompt appears again, the installation is complete.

On Windows Server 2008, you can use the Role Management tool to install optional components.
  1. Start Server Manager. Click Start, right-click Computer, and then click Manage.
  2. If the User Account Control dialog box appears, confirm that the action it displays is what you want, and then click Continue.
  3. In the Features Summary section, click Add features.
  4. In the Add Features Wizard, select Telnet Client, and then click Next.
  5. On the Confirm Installation Options page, click Install.
  6. When installation finishes, on the Installation Results page, click Close.

On Windows 7, Windows Vista, you can use the Windows Features tool to install optional components.
  1. Click Start, and then click Control Panel.
  2. On the Control Panel Home page, click Programs.
  3. In the Programs and Features section, click Turn Windows features on or off.
  4. If the User Account Control dialog box appears, confirm that the action it displays is what you want, and then click Continue.
  5. In the Windows Features list, select Telnet Client, and then click OK.

    Sumber : http://technet.microsoft.com/en-us/library/cc771275%28v=ws.10%29.aspx

    Install telnet in Windows 8

    1. Move the mouse as far as possible into the bottom left corner of the screen and right click
    2. Click Programs and Features
    3. Click Turn Windows features on or off
    4. Put a tick next to Telnet Client
    5. Click OK
    6. When the message Windows completed the requested changes appears, click Close

Thursday, August 29, 2013

Reset Password Win 7 & Win Server 2008

Beberapa minggu yang lalu, lupa akan password WS 2008 R2 yang baru saia tukar membuat beberapa pekerjaan tertunda. Ternyata setelah keliling-keliling dunia mencari suhu-suhu di google, akhirnya saia menemukan cara yang unik dan ini merupakan bugs dari Windows Vista, Windows 7, dan Windows Server 2008 yang menggunakan fitur-fitur default yang biasanya tidak dinonaktifkan. Lupa akan password bisa bahaya, apalagi kalau passwordnya bisa di tukar orang yang tak bertanggung jawab… tapi ini menyelamatkan sedikit dari sisa pekerjaan saia. Check it out…

[SOLVED] Reset Password Win Vista, Win 7 & Win Server 2008

Artikel berikut ini digunakan pada komputer yang sama sekali tidak ada user yang bisa login bahkan administrator sekalipun. Sehingga tujuan artikel ini, agar user yang kita targetkan dapat dirubah passwordnya.
Warning : Ini digunakan untuk tujuan pembelajaran saja, silahkan matikan fitur yang tersebut jikalau tidak dipakai. Jika penyakit berlanjut hubungi dokter… :D
Bahan-bahan yang harus disiapkan :
  • Bootable DVD Instalasi dari Win Vista / Win 7 / ataupun Win Server 2008 ( pada artikel ini saia menggunakan Win 7 Ultimate 32 bit )
  • Komputer yang lupa password tentunya… :D
Kalau bahan sudah lengkap.. ikuti langkah-langkah berikut ini :
  1. Boot lewat DVD Instalasi
  2. Masuk ke “Repair your computer
    [SOLVED] Reset Password Win Vista, Win 7 & Win Server 2008
  3. Pilih Sistem Operasi aktif
  4. Lalu masuk ke mode “Command Prompt
    [SOLVED] Reset Password Win Vista, Win 7 & Win Server 2008
  5. Lalu backup magnify.exe menjadi magnify.old
    copy x:\windows\system32\magnify.exe x:\windows\system32\magnify.old
    x = direktori partisi system windows
  6. Lalu copy cmd.exe menjadi magnify.exe
    copy x:\windows\system32\cmd.exe x:\windows\system32\magnify.exe
    x = direktori partisi system windows
    [SOLVED] Reset Password Win Vista, Win 7 & Win Server 2008 
  7. Lalu Klik Restart, dan booting dari Harddisk.
  8. Klik tombol Ease of access ( fitur accessibility ) di kiri bawah login screen.
    [SOLVED] Reset Password Win Vista, Win 7 & Win Server 2008
  9. Lalu centang kotak yang mengaktifkan Magnifier. Lalu Klik OK.
    [SOLVED] Reset Password Win Vista, Win 7 & Win Server 2008
  10. Terbuka cmd.exe yang kita copy kan tadi. Lalu ketikkan perintah berikut,
    net user namauser passwordbaru[SOLVED] Reset Password Win Vista, Win 7 & Win Server 2008
  11. Selesai, langsung login dengan user baru di Login Screen.
    [SOLVED] Reset Password Win Vista, Win 7 & Win Server 2008
  12. Jangan lupa untuk mengembalikan magnify.old ke magnify.exe agar fungsi magnify berfungsi kembali.
Cara ini merupakan bugs, jadi jikalau anda tidak ingin password and diganti oleh orang yang tidak bertanggung jawab, matikan fitur ease of access dari windows anda. Walaupun kadang bisa bantu kita untuk mereset password sendiri seperti saia. hehehe…
sumber inspirasi : disini

Download Kalender 2021 Masehi / 1442 Hijriyah

Sumber artikel :  https://pintardesain.com/download-kalender-2021/ Download Kalender 2021 Masehi / 1442 Hijriyah File CorelDraw. Lengkap 12 ...