Thursday, September 26, 2013

How to Enable or Disabled Name Auto Complete in Outlook 2010

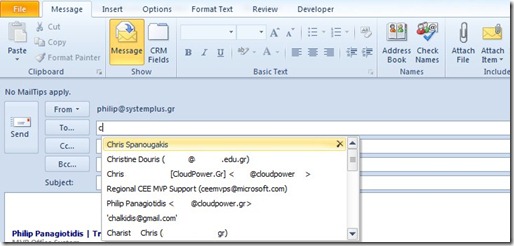
Many times we type in an e-mail address in the fields To:, Cc:, Bcc:, we notice Outlook suggesting different addresses according to the letter that we have typed. This function to some people may seem very useful and to some very annoying. In the image below I have typed the letter c and straight away the suggested addresses appear where we just select with our mouse the name that we want to, and straight away the whole recipients address is imported to the according field that we had selected.
 
00

Further down I will describe how can we Enable or Disable the AutoComplete function:
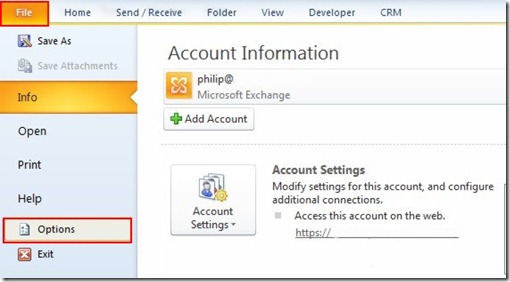
1. Once I have started Outlook 2010, I select the File Tab, so we can go in backstage view and from the menu with the available options I select the Options command as shown in the image below.
01
2. Immediately the Outlook Options window appears, where on the left where all the categories are we should select the Mail category as we can see in the image below.
02
3. Once we have selected the Mail category from the Outlook Options window we navigate further down in the window until we locate the Send Messages category at the right of the window, where we should enable or disable the command Use Auto Complete List to suggest names when typing in the To, Cc and Bcc Lines”.  That’s just about it.
03
We also can clean the Auto-Complete list just by selecting the button Empty Auto-Complete List. Once we press the button a Warning Dialog Window will appear asking us whether we are sure or not to empty it, by clicking on the appropriate buttons Yes or No.
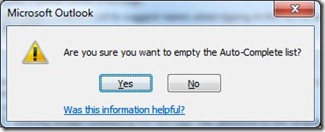
04

Wednesday, September 11, 2013

The User Profile Service failed to logon

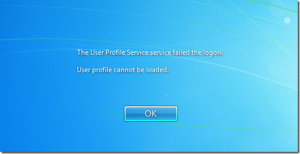
Got this message on a client workstation last week. It was running managed Symantec Endpoint Protection client 12.1…so much for that. The message is caused by a clever virus/worm/malware application which makes a small change in the Windows 7 registry and voila users can’t log in anymore…all they get is the following message when they attempt to log in with their username/password:

[The User Profile Service service failed to logon.]
[User profile cannot be loaded.]

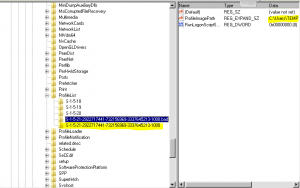
Further analysis of the registry shows that the user accounts in HKEY_LOCAL_MACHINE\SOFTWARE\Microsoft\Windows NT\CurrentVersion\ProfileList have been copied, the modified and the original renamed by an appended “.bak”. The modification essentially points to a hard drive location which does not exist or worse yet, exists with a profile that upon login displays a message stating you must pay money to get your files back.
There’s a Microsoft KB article on this as well with steps on how to fix this here, but I found these steps faster and easier:
[step 1] Boot to safe mode by mashing the F8 key repeatedly during a reboot until you see startup choices.
[step 2] You should be able to log in as the previously disabled user…if not, fire up safe mode with command prompt and type net user administrator /active:yes to enable the administrator account. Then start over from [step 1] but log in as Administrator instead of the disabled user account.
[step 3] Open Regedit and locate HKEY_LOCAL_MACHINE\SOFTWARE\Microsoft\Windows NT\CurrentVersion\ProfileList.
[step 4] Locate any keys with .bak appended to them and find their duplicates minus the .bak. Rename those keys to .old and then rename the keys with .bak such that just the “.bak” is deleted.

if [step 4] is too confusing and/or does not resolve the problem, try:
  • Find two folders starting with S-1-5 followed by same long numbers and one of them ended with .bak.
    1. Right click the folder without .bak and choose Rename. Then add .ba at the end of the folder name.
    2. Right click the folder with .bak and choose Rename. Then remove .bak at the end of the folder name.
    3. Right click the folder with .ba and choose Rename. Then change the .ba to .bak at the end of the folder name.
  • If you have only one folder starting with S-1-5 followed by a long numbers and ended with .bak. Right click the folder and choose Rename. Then remove .bak at the end of the folder name.
[step 5] Choose the folder without .bak, in the right pane, double click RefCount and type 0 (zero) and then click OK.
Choose the folder without .bak, in the right pane, double click State and type 0 (zero) and then click OK.
[step 6] Close regedit and Reboot.
That’s it. You should now be able to log back into your system using your standard username/password. I’d also recommend running a full antivirus scan.

sumber : davidvielmetter.com/tips/the-user-profile-service-failed-to-logon

Wednesday, September 04, 2013

Windows 2008 Server - File Server Resource Manager - Configuring Email Notification Error


When I try to set the Email Notification in FSRM I get the following error after clicking on Send Test Email button:
 
Failed to send the test e-mail sue to the following error: Cannot send the email due to an error. Check the application event log for more information.
 
 
My company Email Server is Microsoft Exchange 2010 SP2. This error comes up because I try to send an email from a server not recipient and also without any authentication .
 
Solution:
I created a receive connector on Exchange Server -> Server Configuration -> Hub Transport as below:
  • In the Introduction Page of creating New Connector, define a name for connector and select the Custom for Intended use for this Receive Connector and click Next.
  • In Local Network Setting page, leave the defaults and click Next.
  • In Remote Network Setting page, click on Edit button and enter the FSRM server IP Address into Start Address field  and Subnet Mask of server in End Address Filed and click ok then click Next.
  • Click NEW  in next page and click Finish in final Page.
  • Right click on the connector and click on Properties.
  • Select Permission tab and check the Anonymous Users. Then click on ok .
 Finally I check the FSRM server again and click on Send Test E-mail. The problem solved.
 
 
Sumber : http://iportal.hedcoint.com/ICT/TBlog/Lists/Posts/Post.aspx?ID=237

Tuesday, September 03, 2013

Install Telnet Client

Telnet Client is not installed by default on Windows 7, Windows Server 2008 R2, Windows Vista, or Windows Server 2008. The procedures to install Telnet Client vary based on the operating system you are using:
Membership in the local Administrators group, or equivalent, is the minimum required to complete this procedure.

On Windows 7, Windows Server 2008 R2, Windows Server 2008 or Windows Vista you can use the following command line procedure to install Telnet Client.
  1. Open a command prompt window. Click Start, type cmd in the Start Search box, and then press ENTER.
  2. Type the following command:
    pkgmgr /iu:"TelnetClient"
  3. If the User Account Control dialog box appears, confirm that the action it displays is what you want, and then click Continue.
  4. When the command prompt appears again, the installation is complete.

On Windows Server 2008, you can use the Role Management tool to install optional components.
  1. Start Server Manager. Click Start, right-click Computer, and then click Manage.
  2. If the User Account Control dialog box appears, confirm that the action it displays is what you want, and then click Continue.
  3. In the Features Summary section, click Add features.
  4. In the Add Features Wizard, select Telnet Client, and then click Next.
  5. On the Confirm Installation Options page, click Install.
  6. When installation finishes, on the Installation Results page, click Close.

On Windows 7, Windows Vista, you can use the Windows Features tool to install optional components.
  1. Click Start, and then click Control Panel.
  2. On the Control Panel Home page, click Programs.
  3. In the Programs and Features section, click Turn Windows features on or off.
  4. If the User Account Control dialog box appears, confirm that the action it displays is what you want, and then click Continue.
  5. In the Windows Features list, select Telnet Client, and then click OK.

    Sumber : http://technet.microsoft.com/en-us/library/cc771275%28v=ws.10%29.aspx

    Install telnet in Windows 8

    1. Move the mouse as far as possible into the bottom left corner of the screen and right click
    2. Click Programs and Features
    3. Click Turn Windows features on or off
    4. Put a tick next to Telnet Client
    5. Click OK
    6. When the message Windows completed the requested changes appears, click Close

Download Kalender 2021 Masehi / 1442 Hijriyah

Sumber artikel :  https://pintardesain.com/download-kalender-2021/ Download Kalender 2021 Masehi / 1442 Hijriyah File CorelDraw. Lengkap 12 ...